Technical Bulletins
Guidelines for Properly Patching a BASWA System Finish
October 1, 2025
Learn the step-by-step process for patching and repairing a BASWA acoustical plaster system to restore a seamless, monolithic surface appearance.
A BASWA acoustical plaster system is designed to deliver a seamless, monolithic surface that performs as well visually as it does acoustically. When damage or imperfections occur, a proper repair is essential. Patching done incorrectly can compromise both the appearance of the finished surface and the acoustic function of the system. This guide, along with the video above, walks through the complete repair process from identifying the damage through blending the final material.
Why Following the Repair Guidelines Matters
BASWA systems achieve their seamless appearance through carefully layered application of BASWA material. When patching, it is critical to minimize the repair area, maintain crisp edges, and blend the new material carefully into the surrounding surface. Cutting too deep, leaving loose material in place, or failing to feather the patch properly can result in visible irregularities or inconsistencies in texture that are difficult to correct after the fact.
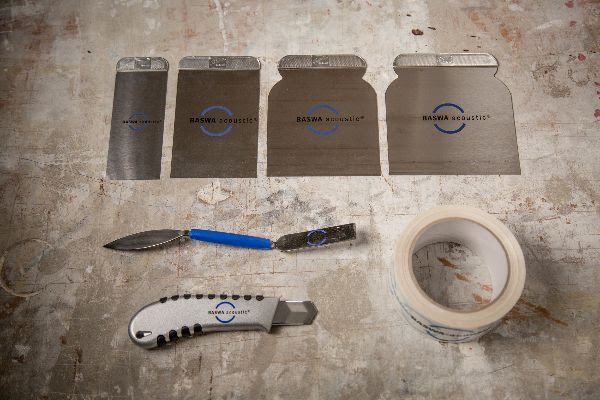
Tools Required
Before beginning any repair, gather the following:
- BASWA tape or thin adhesive tape
- Utility knife
- Trowel
- Japanese Spatula or Japanese Finish Trowel
- BASWA Sanding Tool
What the Video Covers
The video at the top of this page provides a complete visual walkthrough of the patching process. It demonstrates each of the following steps in sequence so you can see exactly how the tools and materials are used together for a professional result.
Properly repairing a BASWA acoustic system ensures a monolithic surface appearance.
Step-by-Step Patching Instructions

Step 1. Identify the area of damage or imperfection.
Locate and assess the full extent of the area that needs repair before beginning any work.
Step 2. Gather your tools.
Confirm you have all required tools on hand before starting. Refer to the list above.

Step 3. Score the surface.
Using a utility knife and the BASWA Sanding Tool as a straight edge, penetrate the surface just enough to remove the damaged portion. Be cautious not to cut any deeper than necessary.

Step 4. Carve out the repair area.
Using a trowel, carefully carve out the area of repair. Remove any loose material while keeping the repair to a minimum size and maintaining a crisp, clean edge.

Step 5. Tape the perimeter.
Apply BASWA tape or thin adhesive tape around the full perimeter of the area that needs patching. This creates a clean boundary for the new material and protects the surrounding finish.

Step 6. Apply BASWA material.
Fill the repair area with properly mixed BASWA material, either Base or Fine, depending on the application. Fill flush with the adjoining adhesive tape.

Step 7. Level the patch.
Using the BASWA Sanding Tool, ensure the repair area is level with the surrounding surface.

Step 8. Remove the tape.
Once the patch has been troweled down tightly with the proper trowels, carefully remove the adhesive tape.

Step 9. Blend the repair.
Trowel down the patched area a few additional times to blend the new material into the surrounding finish, achieving a smooth and consistent surface.
For additional technical support or installation guidance, contact the BASWA team directly at 855.902.2792.
Next Read Recommendation: Protect Your Acoustical Plaster System from Stains and Soil

The BASWA Team
The BASWA Team is the editorial voice of BASWA acoustic North America, a group of acoustical plaster experts and technical support professionals sharing accurate, well-cited insights on sound, well-being, and the built environment. We're here to make acoustics approachable and actionable for architects, contractors, and homeowners.

